

How to Design and Print Notebooks for Your Business
- Leo Xia

- Oct 20, 2025
- 13 min read
To print notebooks for business, define the goal (promo, retail, onboarding), lock specs (size, pages, paper, binding), finalize brand design (logo zones, color, fonts), choose finishes (lamination, foil, edges), then run pre-press checks (bleed/CMYK/proofs) and place production with a certified manufacturer. Plan MOQ/lead time, QC, and packaging for shipping.
Quick Content Reach:
Why Print Notebooks for Your Business
Printed notebooks are practical tools that people use every day, which makes them effective vehicles for marketing and brand reinforcement. Compared with digital swag, notebooks deliver lasting value; users handle them repeatedly, increasing brand impressions each time. Whether you are creating onboarding kits, conference giveaways, limited‑edition retail items or e‑commerce bundles, custom printed notebooks offer a high return on investment. Studies show that tactile and visual cues influence perceptions of quality—people associate a well‑made notebook with professionalism and care. When combined with unique finishes and thoughtful design, notebooks encourage repeat use, thus amplifying your brand reach.
Another advantage of custom printed notebooks is unit economics. Bulk production spreads setup costs across hundreds or thousands of units, making each notebook relatively inexpensive. For corporate gifts or wholesale resale, notebooks can be paired with complementary products—pens, sticky notes, planners—to create bundles that justify higher price points. Since a notebook can easily be reused for months, its cost per impression remains low.

Interested in designing notebooks that reinforce your brand and delight your customers? Email us at Leoxia@lion‑paper.com to discuss your project specifications and receive a customised plan within 24 hours.
Define the Brief Before You Print Notebooks
Every successful notebook project begins with a clear brief. Define the objective of the notebook—promotional giveaway, retail product or internal company journal—and the target user (students, corporate clients, creative professionals). Clarifying the purpose helps determine the appropriate size, paper type and binding style.
Next, consider quantity tiers. For example, pilot runs of 200–300 units allow you to test demand and gather feedback; wholesale orders of 1,000–3,000 units enable economies of scale; subscription boxes may require steady monthly runs. Identify your launch date and work backwards to ensure enough time for design, sampling, production and shipping. If selling in retail channels, you may need barcodes, ISBNs or regional variants; corporate gifts may need compliance with laws like California Proposition 65 or CPSIA (for children’s items).
Finally, document any special requirements such as branding guidelines, eco certifications, or customization (like including employee names). Sharing a detailed brief up front helps your printing partner deliver accurate quotes and avoid costly changes later.
Not sure how to define your brief? Send us your ideas and timeline, and our experts will help you scope quantities, compliance considerations and production timelines.
Specs That Matter: Size, Pages and Paper
Selecting the right size, page count and paper stock influences both cost and usability. Here are key considerations:
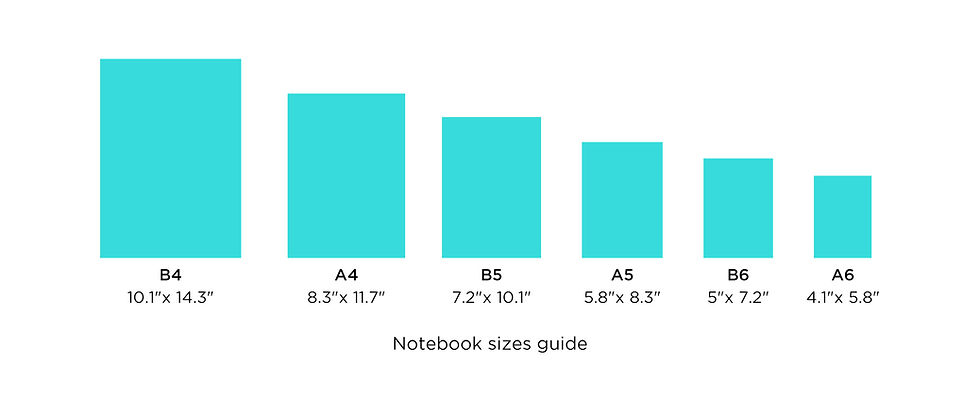
Sizes & Trim
Common notebook sizes include A5 (5.8 × 8.3 in), B5 (6.9 × 9.8 in), 5 × 8.25 in, 7 × 9 in and 8.5 × 11 in. A5 and 5 × 8.25 in are portable and ideal for giveaways; larger formats like B5 and 8.5 × 11 in offer more writing space but cost more to ship and display. Consider mailer size restrictions and retail shelf dimensions when choosing trim size.
Page Count & Signatures
Common page counts for business notebooks are 128, 160 or 192 pages. These counts optimise paper yield and accommodate imposition (arranging pages on printing sheets). If your notebook includes calendars, planners or guided content, adjust the page count accordingly. Work with your printer to set up signatures—groups of folded pages that form the book block—to minimise waste and ensure proper page sequencing.

Paper Choices
Paper weight affects writing experience, transparency (show‑through) and cost. For general writing, 70–100 gsm uncoated paper works well; it prevents ink bleed and provides a pleasant writing surface. For inserts, tab dividers or art prints, choose heavier paper (120–160 gsm). Uncoated paper is ideal for pen or pencil, while coated paper (silk or gloss) provides a smooth surface for images and can be used on covers or promotional pages. Eco‑conscious brands may opt for FSC‑certified or recycled stocks to conserve resources and appeal to sustainability‑minded customers.
Opacity, Smoothness and Recycled Content
Look for paper with good opacity (to reduce show‑through), a smooth finish (to enhance writing comfort) and, if desired, a high percentage of post‑consumer recycled fibre. Paper vendors often provide specifications for whiteness and brightness that affect how printed colours appear. When selecting recycled paper, consider whether you need TCF (totally chlorine‑free) or ECF (elemental chlorine‑free) bleaching to avoid harmful chemicals.
Choosing paper can be daunting. Tell us your desired thickness and writing medium, and we’ll send you a swatch book with recommended stocks and finishes.
The binding style influences durability, cost and user experience. Here are the main options:

Sewn Hardcover
Smyth‑sewn (section sewn) hardcovers are the gold standard for premium notebooks. Signatures are sewn together and attached to a hard case, creating a durable book block that lays flat when opened. This binding is ideal for executive gifts, long‑term journals and archival books. It allows the notebook to endure heavy use without pages falling out and works well with cloth, vegan leather or paper‑wrapped covers.
Perfect Bound Softcover
Perfect binding glues single sheets or folded signatures to a flexible spine, creating a clean paperback look. It’s cost‑effective and works well for standard page counts. However, perfect‑bound books do not lay completely flat and may require more care during use. This style suits promotional notebooks, magazines and catalogues.
Wire‑O or Spiral Binding
Wire‑O and spiral bindings use metal or plastic loops to hold pages together, allowing 360° rotation. They are popular for planners, sketchbooks and reference materials because they lie flat and allow the pages to fold back on themselves. Spiral binding is often cheaper; Wire‑O has a more polished appearance and can accommodate higher page counts. Consider adding protective covers (polypropylene or thicker card) and choose coil colours that complement your brand.
Case Materials
The cover sets the tone for your notebook. Common options include art paper laminated with gloss, matte or soft‑touch film; cloth or linen for a textured feel; PU or vegan leather for durability; and kraft paper for a natural look. Soft‑touch and linen covers pair well with foil stamping and debossing, while art paper can carry full‑colour graphics. Choose case materials that align with your brand values and the notebook’s purpose.
Unsure which binding suits your notebook? Email us your desired user experience (lay‑flat, portable, premium) and we’ll recommend the best combination of binding and cover materials.
Binding at a Glance
Binding | Look/Use | Pros | Watch-outs |
Smyth sewn HC | Premium/keepsake | Lays flat, durable | Higher unit cost |
Perfect bound | Retail softcover | Clean spine, low cost | Doesn’t lay fully flat |
Wire-O/spiral | Planners/sketch | 360° fold, writable | Exposed wire, retail hooks |
Brand‑Forward Design System
A strong visual identity enhances the impact of your notebooks. Begin by defining where your notebook company logo will appear: spine, lower‑right corner of the cover, centre of the back or inside the flyleaf. Consistency across products helps reinforce brand recall.
Next, manage colour across your design. Work in CMYK for print, using Pantone bridges for spot colours. Maintain sufficient contrast between text and background for legibility. Use a proofing sequence—digital soft proof followed by a hardcopy contract proof—to ensure colour accuracy and avoid surprises.
For interior layouts, design templates based on how users will use the notebook. Options include lined pages for general note‑taking, dot‑grid for bullet journals, project trackers and OKR (Objectives and Key Results) pages for corporate planners. Consider adding content such as calendars, contact lists, or inspirational quotes. When designing corporate notebooks, reserve space for legal or safety information.
Accessibility and legibility are critical. Keep line spacing comfortable, use fonts sized appropriately for long handwriting sessions, and avoid heavy ghosting by choosing the right paper and ink.

Need help tailoring your interior layout and brand design? Send us your logo and colour palette, and we’ll create a design system that resonates with your audience and looks great in print.
Finishes that Signal Quality (and When to Use Them)
Finishes elevate notebooks from functional items to keepsakes. Select finishes based on the intended market and budget:

Laminations
Laminating the cover enhances durability and feel. Gloss lamination adds shine and makes colours vibrant, but fingerprints may be visible. Matte lamination offers a sophisticated, non‑reflective surface with good scuff resistance. Soft‑touch lamination provides a velvety texture that feels luxurious and encourages interaction. Lamination not only extends the life of the notebook but also protects your artwork.
Foil, Emboss and Deboss
Foil stamping applies metallic foil (gold, silver or coloured) to logos and titles using heat and pressure, adding prestige and a reflective sheen. Embossing raises a design element, while debossing presses it into the surface. These techniques add tactile interest and highlight key areas. When combining foil and embossing, foil is typically applied first, followed by embossing. Use foil or emboss to emphasise your company logo or special edition features.
Spot UV vs. Varnish
Spot UV coating applies a clear, glossy layer to specific areas of your cover, creating contrast with matte or uncoated areas. It’s excellent for highlighting logos or patterns. In contrast, varnish is a liquid coating applied across the entire page or cover; gloss varnish adds sheen, while matte varnish softens colours. Spot UV is more dramatic but typically more expensive than varnish. Use it sparingly for maximum effect.
Practical Add‑Ons
Add functionality with elastic bands to keep the notebook closed, pen loops to ensure a writing instrument is always handy, ribbons for bookmarks, pockets for storing receipts or cards, and tabs to divide sections. These extras enhance the usability of the notebook and increase perceived value.
Need help choosing finishes within your budget? Send us your specifications and we’ll propose two finish stacks (basic and premium) complete with MOQs and lead times.
Pre‑Press to Press: Zero‑Error Workflow
Printing notebooks is as much about preparation as production. A well‑executed pre‑press workflow prevents costly mistakes and delays.
File Preparation
Prepare artwork at 300 dpi in CMYK colour space. Include a 3 mm bleed on all edges and maintain a 5 mm safe zone so critical text and logos don’t get trimmed. Outline all fonts or provide fonts with your file, and embed or link high‑resolution images. Provide a multi‑page PDF for the interior and a separate PDF for the cover and spine.
Colour Proofs
Start with a digital soft proof (PDF) to check alignment, spelling and general colours. Then request a hardcopy contract proof for critical colour matching, especially if using Pantone spots or corporate colours. Finally, attend a press check (virtually or in person) to approve first sheets off the press and ensure colour, registration and finish align with your expectations.
Imposition & Creep
For thick notebooks, pages in the middle of a signature can shift due to folding. This ‘creep’ must be compensated in the imposition stage. Your printer will adjust margins accordingly, but ensure you allow enough safe area so that text doesn’t drift toward the spine.
Pilot Run / Golden Sample
Before mass production, request a pilot run or golden sample. This one or two units replicate the final product with all finishes and binding. Review it carefully; any corrections made after mass production starts will be expensive.

Concerned about pre‑press? Send us your files for a free preflight check; we’ll flag any issues and ensure your print job runs smoothly.
Costing, MOQ & Lead Time: What Moves the Number
Multiple factors influence the cost of printing notebooks:
Top Cost Drivers
Paper grade: Recycled or standard 80 gsm is cheaper than premium 100 gsm paper.
Cover material: Art paper is affordable; cloth, PU or linen increases unit cost.
Binding type: Perfect binding is economical; Smyth sewn and Wire‑O cost more due to added labour and materials.
Finishes: Simple matte lamination is affordable; adding soft‑touch lamination, foil stamping, embossing or gilded edges increases cost.
Labour: Complexity of the project, including quality checks, influences price.
MOQ Bands and Price Breaks
Printers typically offer price breaks at 300, 500, 1,000, 3,000 units and higher. The more you print, the lower your per‑unit cost because fixed setup costs are spread over a larger run. Certain finishes have higher MOQs: for example, gilded edges might only be available from 500 units due to setup time.
Freight Considerations
When calculating landed cost, include shipping method (sea vs. air), carton count and volume (CBM), and duties/taxes based on harmonised system (HS) codes. Sea freight is slower but cheaper; air freight is faster but adds cost. Consolidate shipments to reduce carbon footprint and per‑unit shipping costs.
Need a quote? Share your specs—including quantity range—and we’ll provide two options: standard and premium, complete with shipping estimates.
Packaging That Protects and Sells
Packaging must protect the notebooks during transit and make them attractive on the shelf. Consider the following:
Unit Packaging
Choose between belly bands (paper wraps with branding and information), card sleeves, recyclable shrink alternatives or simple kraft paper wrappers. Belly bands offer space for barcodes, QR codes and product descriptions without covering the entire notebook. Avoid plastic shrink wrap whenever possible, opting for biodegradable film or paper sleeves.
Retail Sets
Retail notebooks often sell in multi‑packs (two‑ or three‑pack). Banding them together requires clear labelling and barcode placement. Set up packaging with perforated lines or easy‑open tabs to improve user experience. Use consistent colours and fonts to ensure shelf appeal across product lines.
Master Cartons
For bulk shipping, pack notebooks into sturdy master cartons. Label cartons with SKU, quantity, and orientation; ensure they pass drop tests and humidity tests. Use pallet patterns that distribute weight evenly, and consider using corner protectors or strapping for long transit routes.

Want packaging that protects and sells? Send us your packaging goals and we’ll design a unit and master carton solution that aligns with your sustainability standards.
Sustainability Without Compromise
Environmental responsibility is increasingly important to businesses and consumers. Fortunately, printing sustainably doesn’t mean sacrificing quality.
Eco Papers & Inks
Opt for FSC‑certified or PEFC‑certified papers that support responsibly managed forests. Choose recycled paper with clear post‑consumer content percentages. Use soy or vegetable‑based inks instead of petroleum inks; they contain lower VOCs and are easier to remove during recycling.
Eco Finishes
Select water‑based coatings instead of solvent‑based UV coatings. Soft‑touch films are now available in biodegradable versions. Consider cloth covers, natural fibres or vegan leather. Avoid metallic foils that cannot be recycled; or choose recyclable cold foils where possible.
Certifications to Cite
Demonstrate your commitment by citing certifications such as FSC, ISO 9001/14001 (quality and environmental management), and social audits like BSCI or SMETA. These standards reassure customers that your products meet environmental and ethical criteria .
Looking for sustainable printing options? Ask us for our list of eco papers, inks, finishes and certifications; we’ll guide you through making the right choices.
Quality Control & Risk Management
Maintaining consistent quality is essential to uphold your brand reputation. Implement quality checks at every stage:
Incoming Material Checks
Inspect paper and ink shipments for weight, colour and damage before production. Ensure that the correct materials (e.g., FSC paper) are delivered.
In‑Process Checks & AQL
Monitor colour consistency (ΔE values), lamination adhesion, binding strength and page alignment during production. Use acceptable quality limit (AQL) sampling plans to catch defects early and reduce rework.
Pre‑Shipment Inspection
Inspect finished notebooks for print quality, binding integrity, packaging accuracy and overall appearance before shipping. Document the inspection with photos and video; for example, Lion Paper Products’ quality inspectors record the process for traceability.
Defect Library & Rework Loop
Maintain a catalogue of common defects (e.g., smudged ink, misaligned pages, lamination bubbles). Establish a rework plan with your printer to address any issues quickly. Provide clear guidelines on acceptable tolerances and require sign‑off before final delivery.
Concerned about quality? Our team documents every step and can share QC videos and inspection reports to give you peace of mind.
Vendor Selection: Custom Notebook Printing Services
Choosing a capable printing partner is critical to the success of your project. When evaluating a custom notebook printing service or custom journal printing company, consider the following criteria:
Capability and Portfolio
Assess the vendor’s ability to handle the finishes you desire—such as gilded edges, spot UV, soft‑touch lamination or Wire‑O binding—and check samples of past work for quality. Ask whether they can produce unique features like custom edges, inserts or flexible MOQs.
Compliance and Certifications
Ensure the printer meets relevant certifications like ISO 9001 (quality), ISO 14001 (environment), FSC, BSCI or SMETA (social responsibility), and any industry‑specific requirements. Certifications indicate a structured approach to quality and sustainability management.
Communication & Project Management
Look for bilingual project managers who offer clear timelines, regular updates and change logs. Good communication helps prevent errors and ensures your design intent is realised.
Trial Orders and Sampling
Start with a small run (300–500 units) and test two finish variants. Evaluate colour, binding durability and user feedback. A reliable printer should handle samples within 5–7 days, and full production runs within your required timeline.
Comparing notebook printing services? Email us for a side‑by‑side quote from our China and Cambodia facilities. We’ll match your specs, certify materials and propose transit options.
Common Mistakes to Avoid
Even with careful planning, mistakes can occur. Avoid these common pitfalls:
Over‑inked interiors causing show‑through: select proper paper weight and avoid heavy coverage on both sides of the page.
Ignoring creep allowance: design margins can shift toward the spine in thicker books; work with your printer to account for this.
No humidity plan: environmental changes can warp paper; ensure proper acclimatisation and packing.
Last‑minute Pantone swaps: colour changes after proofing can delay production.
Forgetting barcode placement: for retail books, ensure space for barcodes and price stickers on covers or belly bands.

Have concerns about avoiding mistakes? Share your design files early—our team will review them and point out potential issues before production.
Final Words
Designing and printing notebooks for your business is more than just choosing a cover. It involves aligning your product with brand identity, user needs and budget while ensuring quality and sustainability. By defining a thorough brief, selecting appropriate specs, choosing thoughtful finishes, preparing files correctly and partnering with a certified manufacturer, you can create notebooks that inspire loyalty and deliver measurable returns. Avoid common pitfalls, track your metrics and iterate on feedback to achieve long‑term success.
Lion Paper Products stands ready to assist you at every stage. We have our own factories in China and Cambodia, as well as a partner facility in South Korea. Our management team has over ten years of experience serving the U.S. market and our R&D team can produce customised samples within 5–7 days. With certifications like ISO 9001, FSC, SEDEX SMETA, BSCI, Disney FAMA, GSV and SQP, we ensure ethical production, high quality and on‑time delivery.
Ready to bring your notebook vision to life? Email Leoxia@lion‑paper.com or WhatsApp +86 137 5075 6354 for a two‑option quote and sample plan tailored to your specifications.
—Leo Xia, CEO, Lion Paper Products
You design, we deliver.
FAQs:
Q1: What size should I choose to print notebooks for business?
A: A5/B5 work for most applications; choose based on mailing cost and writing comfort.
Q2: What paper weight prevents ink bleed?
A: 90–100 gsm for gel pens; 100–120 gsm for markers.
Q3: How many pages are ideal?
A: 128–192 pages balance weight and lifespan.
Q4: What’s the typical MOQ and lead time?
A: MOQs typically range from 500–1,000 units; lead time after proofing is about 5–7 weeks.
Q5: Are eco options available when we print notebooks?
A: Yes—choose FSC or recycled paper, soy/vegetable inks and water‑based coatings.
Are you looking for a reliable manufacturer? Reach out to Lion Paper for a free quote and consultation. Let’s collaborate on creating custom writing paper products that will set your brand apart from the competition!
About Lion Paper
Company Name: Lion Paper Products
Office Address: 20th floor, Chuangyedasha Building, No. 135, Jinsui Road, Jiaxing City, Zhejiang Province, China
Factory Address: No.135, Xuri Road, Jiaxing City, Zhejiang, China
Email: Leoxia@lion-paper.com
Audit Certifications: ISO9001:2015/FSC/SEDEX SMETA/Disney FAMA/GSV/SQP


Comments